Chapter One: Getting Started #
Getting started with a good plan is the most challenging part of building software. This chapter covers how to do that.
Effective Async Technical Discussions #
What makes a useful technical discussion? Several techniques significantly enhance a professional conversation around technical details.
Here is a screencast on how to create a useful technical discussion.

Video Link: https://www.youtube.com/watch?v=gcbjlq3B4cw
Reproducible Code #
If a discussion involves code, the ability to reproduce the system significantly enhances the conversation. The source code that is shared or discussed must run smoothly. If not, then it could add zero or even negative value to sharing it. Hosted git and hosted Jupyter Notebooks are two common ways to solve this problem.
Hosted git
#
Three main versions of hosted git are: bitbucket, github and GitLab. They all provide ways to share and reproduce code. This code can share within the context of a software development project, and it can also share in an async based discussion like chat.
Let’s focus on Github, the most commonly encountered of these options. There are two main ways to share code with others. One method is to create a public repo. and share code and/or markdown files. One nice side effect of markdown files is that they can also serve out via webpages through GitHub Pages or through a blog engine like Hugo, which can build pages <1 ms per page.
Another powerful feature of Github is a gist. What is particularly useful about a gist is that it can be shared with syntax highlighting and formatting. Here are the steps:
-
Create gist

-
Share gist

-
Here is the URL to share: Gist Example Many chat programs will automatically render out the code snippet.
Hosted Jupyter Notebooks #
In theory, Jupyter Notebooks solve a massive problem in creating reproducible code, but it needs some help in practice. A fundamental limitation of Jupyter is the Python packaging environment. It is a helpless victim to the untamed complexity of the underlying operating system.
Fortunately, there is an easy solution. Jupyter notebooks that have a portable runtime are the reproducible ones. Portable runtimes include docker and colab. Docker format files can specify what the runtime should be like, including the packages that need for installation.
One example of a hosted runtime can is in this project: Container Microservices project.
For a user to recreate the code and run it locally, they can do the following:
#!/usr/bin/env bash

# Build image
docker build --tag=flasksklearn .

# List docker images
docker image ls

# Run flask app
docker run -p 8000:80 flasksklearn
This approach is optimized for deployment and has some advantages for communication focused on deploying software. A second approach is the colab approach. In this colab example the notebook note only has the complete code, but with a click of the “Open in Colab” button, a user can completely reproduce what was shared.

Audio, Video and Images #
Adding audio, video, and images can significantly enhance a technical discussion.
Sharing images #
One simple “hack” for sharing images is to use Github issues. Here is an example of this in action.

Screencasts #
Doing a quick screencast can boost a discussion value. Here is a screencast of creating an AWS Lambda function; this is an excellent example of a short demo video.

Video Link: https://www.youtube.com/watch?v=AlRUeNFuObk
Here is another screencast on what to consider when creating a technical video.

Video Link: https://www.youtube.com/watch?v=upQEE9jwI3M
You can create screencasts quickly using the software you probably already have on your machine. Options include: Zoom, QuickTime Player and Camtasia.
Produce Once, Reuse Many #
One thing to keep in mind with technical discussion is produce once, reuse many. There are many outlets for a professional review, including classroom discussions, work discussions, books you are writing, or software projects you are contributing.
You can use these notes and code samples for years or even the rest of your life if you produce high-quality technical notes. Why not create high-quality comments so you can “reuse” these assets in many ways.
Technical discussions as a form of active learning #
One substantial advantage of technical discussions is they serve as a form of active learning. Writing software in a professional setting with modern software development practices often involves many team interactions (i.e. pull requests). This is a form of “super-charged” learning that enables software engineers to learn at an extraordinary pace.
Effective Async Technical Discussions Conclusions #
Building software or doing data science is not about setting aside a session and building something to stop. It is an iterative form of group communication. In turning in homework assignments or finishing a commercial project ticket, the conversation is where the most value occurs versus just the raw software code.
Exercises-Create technical posts #
Topic: Create technical posts #
Directions #
-
Part A: Use the techniques described above and create one or more “technical” posts in a chat channel like Slack, Piazza or Canvas. Express your idea in code using one or many of the techniques described above.
-
Part B: Comment and reply to at least one person where you learned a new technique.
-
Part C: After the “dust” has settled in a day or two, write down and document what you learned so you could use it.
-
Part D: “Demo” your post
Effective Async Technical Project Management #
Why Software Projects Fail #
It is common for software projects to fail. Working in the Bay Area for over a decade, I saw more failed projects than successful projects. Here is what most likely goes wrong:
- Lack of automation
- Lack of effective project management process
- HIPPOs (Highest Paid Person’s Opinion) and Heros let everyone down. This approach is another way of saying EGO IS THE PROCESS.
- Lack of effective technical management
- Lack of experience building software that works and is on-time
- Overconfidence
- Failing in love with the complexity of any kind
- Lack of teamwork
Watch a screencast on project management anti-patterns.

Video Link: https://www.youtube.com/watch?v=npiItwe8Cm4
How to ship high-quality software that works and is on-time #
One method of hitting a deadline is creating a plan to hit the deadline. Here is a checklist:
- Start with automation. Before the first line of code, hook it to a SaaS build system that lints and tests code.
- Create a quarterly and yearly plan on a spreadsheet. Guess at the week by week deliverables. Estimate difficulty or time or both for each task.
Watch a screencast on how to do project management with spreadsheets.

Video Link: https://www.youtube.com/watch?v=GbO24oKXyh8
- Create a simple Board based flow: To Do, In Progress, Done. Friday is an excellent day to schedule due dates, and Monday is a perfect day to do a quick “demo.”

Watch a screencast on how to use Trello for project management.

Video Link: https://www.youtube.com/watch?v=TEKMknfwHV4
- Always demo, every Monday. The code has to work and be of the same quality as the final project.
- Never work until the deadline. For a critical period, assume at least a couple of weeks of QA or being late.
- Be on the constant lookup for complexity and reduce it. If there is a choice because two tasks and one is more complex, do the simple version.
- Create a capable team that values process over ego. You can read more about teamwork generally in Teamwork: What Must Go Right/What Can Go Wrong and the last chapter of Python for DevOps.
Watch a video on effective technical teamwork to learn more.
Video Link: https://www.youtube.com/watch?v=7nQkdsAN2dM
- Embrace YAGNI (You Ain’t Gonna Need It).
Other examples of high failure undertakings #
The same software project management principles apply to these other endeavors.
- Diets
Diets, counting calories, and other complex schemes don’t work. Effective automation heuristics like intermittent fasting do. Why does IF work? There is nothing to remember. It is a simple heuristic for a complex problem.
- Exercise and Fitness
Unrealistic goals and overly complicated plans create failure. automation makes compliance. Most people brush their teeth every morning. Why? The intellectual complexity is low, and it is a habit. A daily morning walk is an example of a simple form of automation with 100% success.
- Saving money
What works is automation: passive investment and passive savings. Humans are biased and make mistakes, but automation is forever.
- Writing books
Writing a book is just like building software. Many people fail at writing books because of exploding complexity and lack of automation. The work performed last week is similar to the next week.
Exercises #
Topic: Create a technical project plan for the final project #
Directions #
-
Part A: With your project team, create an approximately 12-week schedule with “two-weeks” of QA built-in. Use a spreadsheet for this. This step means you have to forcefully stop making features and test the code for the final two weeks. This timeline equates to 10 weeks of coding max.
-
Part B: Create a ticket system using Github, Trello, or Jira. Warning the only thing worse than no ticket system is a ticket system that explodes with so much complexity it is unusable. This process is MUCH worse! Embrace KISS
-
Part C: Create an internal “weekly demo” schedule and invite the team to it. Make sure it is brief, and the working code is evident each week. Adjust schedule as you encounter issues.
-
Part D: “Demo,” your setup to class.
Cloud Onboarding for AWS, GCP, and Azure #
This section contains detailed information on how to onboard a company, students, universities, or other organizations to cloud computing. The three major cloud providers are covered: AWS, GCP, and Azure. A key takeaway is that any university student, professor, or organization can benefit from a tremendous amount of free labs and material. It would be foolish to neglect these high-quality free resources.
AWS (Amazon Web Services) #
Amazon is the 800lb guerilla of cloud computing. If you could only pick one cloud to focus on initially, this would be an ideal choice. There are several ways to get started.
AWS Free Tier #
The Free Tier is one of the best choices to get started with the AWS Cloud. I often recommend students use a Free Tier account along with supplemental labs. There is no substitute for working in a real environment.
AWS Academy #
Any academic institution wanting to teach cloud computing should register their organization with AWS Academy. In turn, you will get:
- official certification training material
- comprehensive labs through Vocareum
AWS Educate #
AWS Educate has many tools useful for education. Students can directly register for an account and get access to AWS labs and content. Another useful tool is the ability to register for jobs.
AWS Training #
The AWS training website provides hundreds of free content hours and the ability to register for AWS Certifications.
Onboarding with AWS #
The ideal and recommended approach to developing software and using the platform is to use a cloud-based development environment. AWS has both a cloud shell and full cloud IDE in AWS Cloud9. Either is suitable for the task of onboarding and doing light tasks.
Using AWS Cloud-Based Development environment #
To start setting up a Cloud-based development environment on AWS, follow on with this section’s steps. You can also refer to this Github project on multi-cloud-onboard.
- Step 1: Watch this screencast on what Continuous Integration is and why you need it?
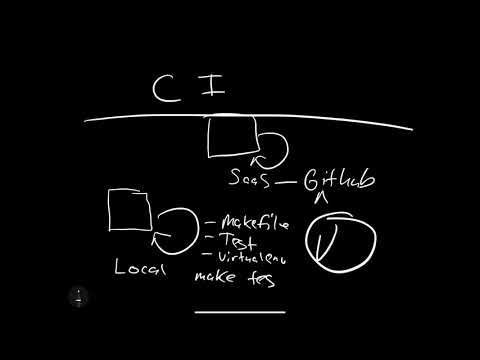
Video Link:https://www.youtube.com/watch?v=QSL17lulDQA
- Step 2: Watch this screencast on how to onboard to AWS Cloud9 for Development.

Video Link: https://www.youtube.com/watch?v=n16t__g19c8
- Step 3: Watch this screencast on “Constructing a Python Project Scaffold.”

Video Link: https://www.youtube.com/watch?v=-mdv2wf8yQ8
- Step 4: Watch this screencast on an “Introduction to Github Actions.”

Video Link: https://www.youtube.com/watch?v=ZvmKdcVGqFI
Microsoft Azure #
There are many incredible resources for Microsoft.
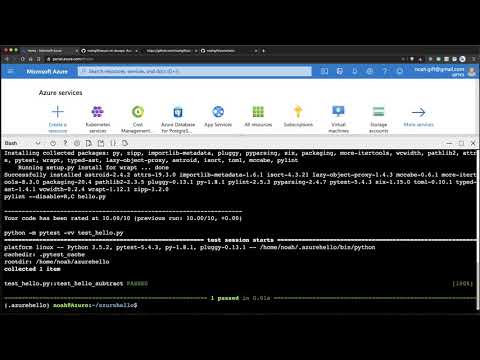
Using Github Actions with PyTest and Azure Cloud Shell #
Let’s also show how an initial cloud-based development environment could work with Azure Cloud Shell and Github Actions. The source code for this example project is here.
You can watch a screencast here of this workflow here.
Video Link: https://www.youtube.com/watch?v=rXXtJpcVems
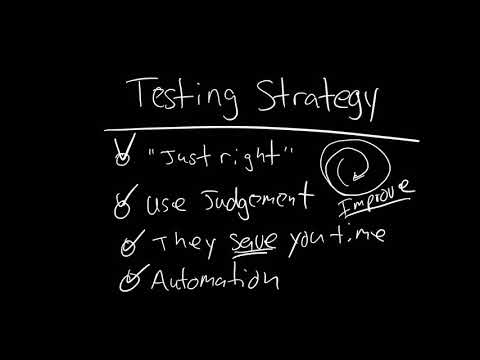
What is Testing? #
Watch this screencast on what testing is.
Video Link: https://www.youtube.com/watch?v=j9a-rbJwqMU
Introduction to Azure Cloud Shell #
What this screencast on an introduction to Azure Cloud Shell.

Video Link: https://www.youtube.com/watch?v=j9a-VAAHwRVEOSw
Introduction to Azure Continuous Integration #
What this screencast on an introduction to Azure Continuous Integration.
Video Link: https://www.youtube.com/watch?v=0IAcF4cfGmI
Steps to run this Azure Github Actions project #
-
Create a Github Repo (if not created)
-
Open Azure Cloud Shell
-
Create ssh-keys in Azure Cloud Shell
-
Upload ssh-keys to Github
-
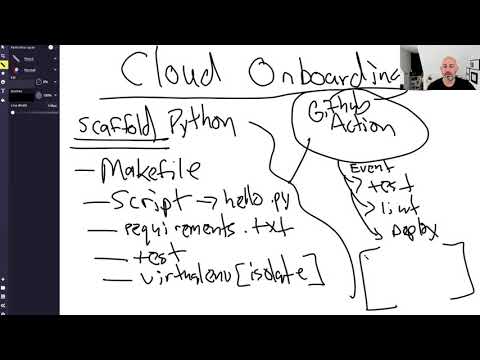
Create scaffolding for the project (if not created)
-
Makefile
It should look similar to the file below.
install:
    pip install --upgrade pip &&\
    pip install -r requirements.txt

test:
    python -m pytest -vv test_hello.py


lint:
    pylint --disable=R,C hello.py

all: install lint test
requirements.txt
The requirements.txt should include:
pylint
pytest
- Create a python virtual environment and source it if not created
python3 -m venv ~/.myrepo
source ~/.myrepo/bin/activate
- Create initial
hello.pyandtest_hello.py
hello.py
def toyou(x):
    return "hi %s" % x


def add(x):
    return x + 1


def subtract(x):
    return x - 1
test_hello.py
from hello import toyou, add, subtract


def setup_function(function):
    print("Running Setup: %s" % {function.__name__})
    function.x = 10


def teardown_function(function):
    print("Running Teardown: %s" % {function.__name__})
    del function.x


### Run to see failed test
#def test_hello_add():
# assert add(test_hello_add.x) == 12

def test_hello_subtract():
    assert subtract(test_hello_subtract.x) == 9
-
Run
make all, which will install, lint, and test code. -
Setup Github Actions in
pythonapp.yml
name: Azure Python 3.5
on: [push]
jobs:
  build:
    runs-on: ubuntu-latest
    steps:
    - uses: actions/checkout@v2
    - name: Set up Python 3.5.10
      uses: actions/setup-python@v1
      with:
        python-version: 3.5.10
    - name: Install dependencies
      run: |
                make install
    - name: Lint
      run: |
                make lint
    - name: Test
      run: |
                make test
-
Commit changes and push to Github
-
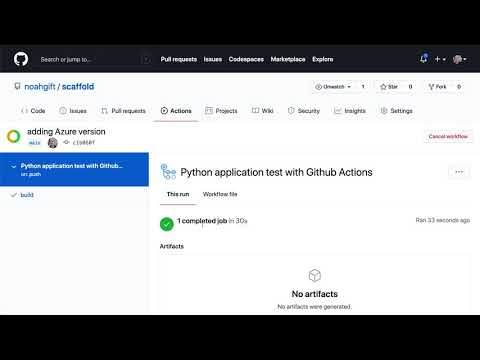
Verify Github Actions Test Software
-
Run project in Azure Shell
Later you could expand this initial setup to allow for an exact continuous delivery workflow. This initial project could be the starter kit to deploy the code to an Azure PaaS.

One way to imagine this is a sequence of steps with branches, as shown.

GCP (Google Cloud Platform) #
The Google Cloud is a smaller player in the cloud world, but they have a unique offering like access to Tensorflow based AutoML systems and deep integration into edge-based workflows using TFHub and Coral.AI
GCP Educational Resources #
There is a lot to like for educators in the GCP cloud platform. One excellent option is students and Faculty can request free training lab credits and courses through Google Education. All educational institutions teaching cloud computing should take advantage of these free resources.
The Google Cloud has a generous Free Tier, just like the other cloud providers.
Qwiklabs is an incredible resource for both teaching and exploration, and Google owns it. Students and Faculty can get free credits through a web request form.
- On-demand training courses with Coursera
Students and Faculty can receive free credits for Coursera courses that directly map to Google Cloud Certifications. Students and Faculty can get free credits through a web request form.
Onboard to GCP (Google Cloud Platform) #
What is Continuous Delivery (CD) and Why Do It? #
Learn what Continuous Delivery (CD) is in the screencast.
Video Link: https://www.youtube.com/watch?v=0IAcF4cfGmI
Introduction to Google Cloud Shell #
Learn what Google Cloud Shell is and how to use it in this screencast. The source code for the tutorial is in this Github Repo.

Video Link: https://www.youtube.com/watch?v=_NgXtlRKbnw
A few highlights to remember are:
Steps to run #
gcloud app create
gcloud app deploy
Gotchas/How To #
- Fork the repo
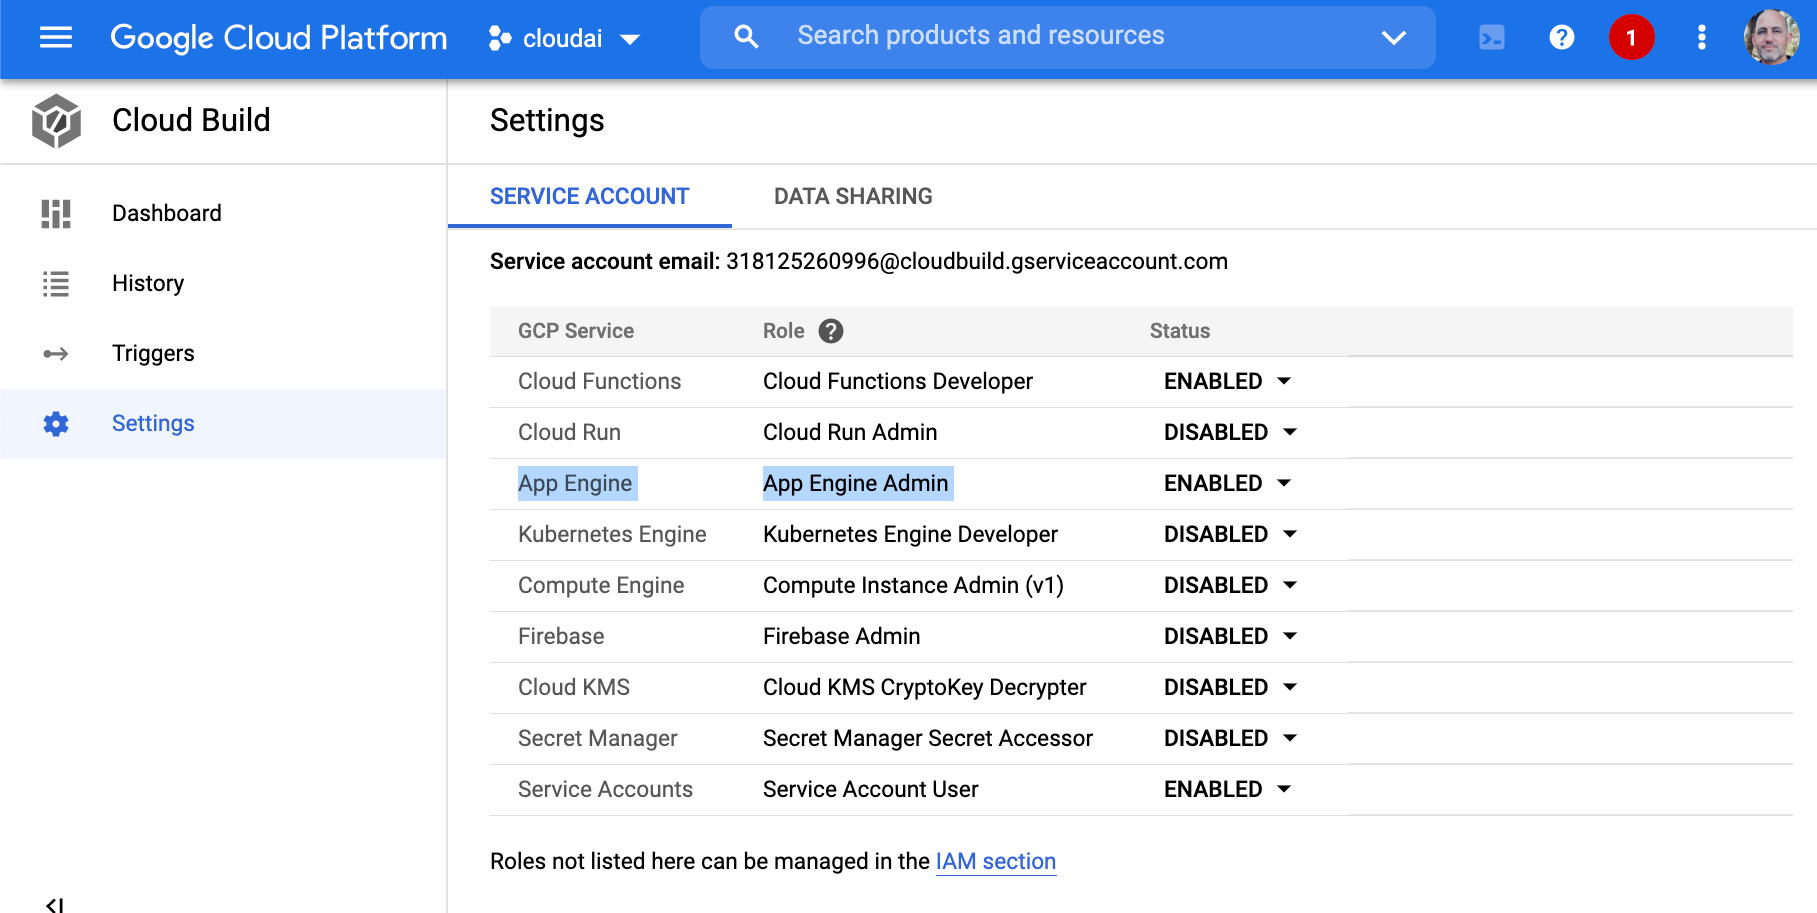
- Setup trigger in Cloud Build
- Make sure you enable these settings
Continuous Delivery of GCP Google App Engine #
One unique feature of Google is GAE or Google App Engine. Learn how to use it to perform Continuous Delivery of a Flask application.

Video Link: https://www.youtube.com/watch?v=2BJSUlaKMjQ
Exercise-Setup-CI-Cloud #
- Topic: Setup Continuous Integration Round-Trip from Cloud Environment
- Estimated time: 30+ minutes
- Slack Channel: #noisy-exercise-chatter
- People: Individual or Final Project Team
- Directions:
-
Part A: Using a Cloud Development environment: GCP Cloud Shell, AWS Cloud or Azure Cloud Shell and set up a Github Project and create the following scaffolding:
- Makefile
- hello world script
- lint it with
pylint - hook up Circleci or Github Actions and
linton the check-in
-
Part B: Document your setup and share via a post on Slack or Chat System.
-
Exercise-Onboard-Cloud-Labs #
- Topic: Onboard to AWS, GCP Labs, and Microsoft Learn
- Estimated time: 15 minutes
- Slack Channel: #noisy-exercise-chatter
- Directions:
- Part A: Log in to Qwiklabs and run a lab you haven’t run before. Paste a screenshot into Slack of something interesting you found.
- Part B: Log into Vocareum and run a lab you haven’t run before. Paste a screenshot into the Slack channel of something interesting you found.
- Part C: Log in to Microsoft Learning and run a lab you haven’t run before. Paste a screenshot into the Slack channel of something interesting you found.
- (Part D: Optional for the ambitious): Use what we learned about effective technical communication and write this up in Github as a brief tutorial. Share this “post” instead of the raw screenshot.
Advanced Case Study: Setup Cloud Environment Continuous Integration from Zero with Docker and CircleCI #
This section covers a more detailed step by step approach to building an advanced cloud development environment that includes Docker, CircleCI, and a linting tool for Dockerfiles. Feel free to skip this section if you are satisfied with your current setup from the above section of the chapter, but it may be useful to browse through the ideas.
The FIRST thing to set up with any new cloud development project is a Continuous Integration pipeline. These steps use a build system CircleCi. They could easily use Github Actions or AWS Code Build.

Using cloud-based development environments solves many significant problems:
- Security Roles are simplified
- Faster communication pathway
- Enhanced IDEs and productivity with a cloud environment.
- All cloud environments have a cloud shell making it very portable to transfer knowledge from one cloud to the next.
Setup and use Github #
To set up and use Github, you need a Github account and internet access. The minimal steps to start are:
- Create a repository, for example,
hello. - Add an SSH key to your Github account.
- Clone the repository locally, for example:
Now, “Clone a repo.”
git clone git@github.com:paiml/hello.git
- Create a change and push it. This step would be an example of a tremendous first change (inside the cloned repo).
Next, “Add a README.md” file and check it in.
echo "# hello" >> README.md
git add README.md
git commit -m "adding name of repo to README"
git push
Setting up and using Virtualenv #
The Python standard library includes a module called venv. A virtual environment solves a fundamental problem in Python. The problem it solves is the isolation of the Python interpreter to a specific directory. In this example, a virtual environment creates in a user’s home directory.
Next, “Create Hello World Virtual Environment in Python”.
python3 -m venv ~/.hello
To use this virtual environment, first, it needs to be activated.
Then, “Activate Hello World Virtual Environment in Python”.
source ~/.hello/bin/activate
Using a repeatable convention to create virtual environments #
Conventions are a powerful way to simplify complex software engineering tasks in a series of easy to remember steps. A convention-based workflow with virtual environments can also dramatically simplify using them. Here is a simple convention to use:
- Create a virtual environment with a
~/.[reponame] format
This step removes the decision about where to put the virtual environment and what to name it. If your git repository is called hello, then you would run the following command:
python3 -m venv ~/.hello
Note that the . makes the virtual environment invisible. This step will prevent your home directory from overflowing with virtual environments when you open it in a GUI or list the contents with ls -l.
- Create an alias in your Bash or ZSH environment.
With ZSH, the config file to edit would be ~/.zshrc in Bash; it would be ~/.bashrc. Inside of this config file, add the following:
## Hello repo
alias hello="cd ~/hello && source ~/.hello/bin/activate"
The next time you open your default shell, this alias will be available. Here is an example of what this workflow looks like on my ZSH environment, which uses a package called oh-my-zsh.
Note: you “Use alias that performs cd and activates hello virtual environment.”
% hello
(.hello) % hello git:(master)
(.hello) % hello git:(master) which python
/Users/noahgift/.hello/bin/python
This convention-based workflow, if followed, makes a tedious and error-prone process easy to remember.
Setup Makefile #
Just like vim, mastering Makefiles can take years, but a minimalistic approach provides immediate benefits. The main advantage of a Makefile is the ability to enforce a convention. If you work on a project every time you follow a few simple steps, it reduces the possibility of errors in building and testing a project.
A typical Python project can improve by adding a Makefile with the following steps: make setup, make install, make test, make lint and make all.
Here is an “Example Makefile”:
setup:
    python3 -m venv ~/.myrepo

install:
    pip install --upgrade pip &&\
    pip install -r requirements.txt

test:
    python -m pytest -vv --cov=myrepolib tests/*.py
    python -m pytest --nbval notebook.ipynb


lint:
    pylint --disable=R,C myrepolib cli web

all: install lint test
This example is from a tutorial repository called myrepo. There is also an article about how to use it from CircleCI. you can watch a screencast on this here: Data Science Build Systems.
Video Link: https://www.youtube.com/watch?v=xYX7n5bZw-w
The general idea is that a convention eliminates the need to think about what to do. There is a common way to install software for every project, a common way to test software, and a common way to try and lint software. Like vim, a Makefile build system is often already on a Unix or Linux system. Even Microsoft uses the Linux operating system in Azure, and the result is that Linux is the preferred deployment target for most software.
Extending a Makefile for use with Docker Containers #
Beyond the simple Makefile, it is also useful to extend it to do other things. An example of this is as follows, using an “Example Makefile for Docker and Circleci.”
setup:
    python3 -m venv ~/.container-revolution-devops

install:
    pip install --upgrade pip &&\
    pip install -r requirements.txt

test:
 #python -m pytest -vv --cov=myrepolib tests/*.py
 #python -m pytest --nbval notebook.ipynb

validate-circleci:
 # See https://circleci.com/docs/2.0/local-cli/#processing-a-config
    circleci config process .circleci/config.yml

run-circleci-local:
 # See https://circleci.com/docs/2.0/local-cli/#running-a-job
    circleci local execute

lint:
    hadolint demos/flask-sklearn/Dockerfile
    pylint --disable=R,C,W1203,W1202 demos/**/**.py

all: install lint test
A Dockerfile linter is called hadolint checks for bugs in a Dockerfile. A local version of the CircleCI build system allows for testing in the same environment as the SaaS offering. The minimalism is still present: make install, make lint, and make test, but the lint step adds a powerful combination for Dockerfile and Python linting.
Notes about installing hadolint and circleci: If you are on OS X, you can brew install hadolint; if you are on another platform, follow the instructions from hadolint. To install the local version of circleci on OS X or Linux, you can run curl -fLSs https://circle.ci/cli | bash or follow the official instructions for local version of the CircleCI build system
Summary #
This chapter covers the theory behind creating software development projects that are on time, high-quality, and maintainable. It also onboards a user to three leading clouds: AWS, Azure, and GCP. It wraps up a more comprehensive and advanced build process that can be an idea for future cloud workflows.
Additional Related Resources #
Github Project for Multi-cloud testing with Github Actions #
Watch Alternate Multi-Cloud Onboarding Lecture #
Video Link: https://www.youtube.com/watch?v=zznvjk0zsVg