Chapter 2: Cloud Computing Foundations #
This chapter covers some of the core building blocks of the Cloud, including the service models and IaC(Infrastructure as Code). Many hands-on examples are in this chapter, including Elastic Beanstalk, Google App Engine, and AWS Lambda.
Why you should consider using a cloud-based development environment #
There is an expression, “use the best tool for the job.” When doing development on the Cloud, often the best tool is the native environment. For most of the examples in this book, a cloud-based development environment is a correct approach. For work on AWS, this means AWS Cloud9 or the AWS Cloudshell. For work on Google, this means Cloud Shell. The same goes with the Azure environment; the Azure Cloud Shell is a powerful and recommended environment to develop in.
They offer “curated” administrative tools preinstalled like a cloud SDK and Linux development tools. Working on a laptop or workstation running Linux, OS X, or Windows can be made suitable for development work, but each presents a unique challenge. It is recommended you use the “native” cloud development tools as the first option and only expand from these tools when you are an advanced user.
Overview of Cloud Computing #
What is Cloud Computing? In a nutshell, cloud computing can use “near-infinite” resources and leverage SaaS platforms built on those resources. Learn what Cloud Computing is in the screencast.
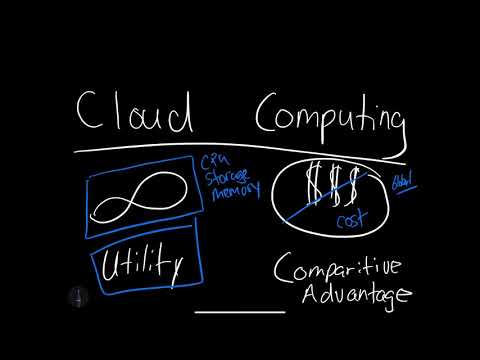
Video Link: https://www.youtube.com/watch?v=KDWkY0srFpg
Economics of Cloud Computing #
What is the Economics of Cloud Computing? Several key factors play into the advantages of Cloud Computing. Comparative Advantage means that a company can focus on its strengths instead of building low-level services. Another factor is Economies of Scale; in the case of a large cloud provider, they can generate cost savings that pass down to the customer. Another is the ability to “pay for what you need,” much like a utility company versus paying the up-front cost of infrastructure and hardware.
Learn what Cloud Computing economics is in the screencast.
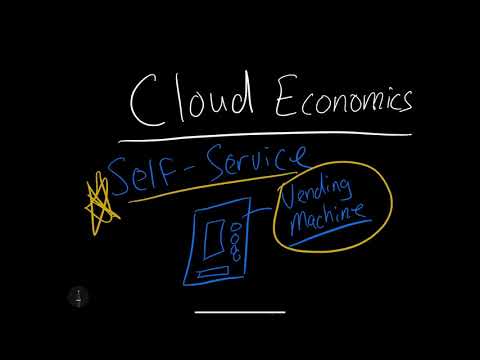
Video Link: https://www.youtube.com/watch?v=22mtNlfGEc8
Cloud Service Model: SaaS, PaaS, IaaS, MaaS, Serverless #
A key takeaway of the Cloud is there are many ways to use it. There are many ways to buy food: in bulk, at the grocery store, at a restaurant, or delivery, there are many ways to use Cloud Computing.
Learn what Cloud Computing Service models are in the screencast.
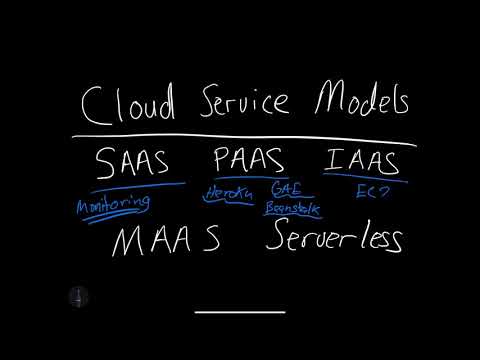
Video Link: https://www.youtube.com/watch?v=7lgy7Cnt72c
Note, there an overview of Cloud Computing available in the book Python for DevOps, Chapter 9: Cloud Computing.
SaaS #
SaaS (Software as a Service) is a hosted software product. A google example is Google Docs or Office 365. Generally, these software products are hosted on cloud platforms and sold via a subscription model.
Paas #
PaaS (Platform as a Service) is a higher-level abstraction for developing software. An excellent example of a PaaS is Heroku. This process allows a developer in a language like Ruby, Python, PHP, or Go to focus mostly on their application’s business logic.
A real-world scenario comparison would be a self-service car wash versus a drive-through car wash. In the drive-through car wash, a customer only has to drive through, not use equipment to wash their car.
IaaS #
IaaS (Infrastructure as a Service) refers to services that provide low-level resources: Compute, Storage, and Networking. Typically these services are low cost to use but require more setup and expertise. On Amazon, these services would be EC2 (compute) and S3 (Storage).
A real-world comparison would be buying grain or beans in bulk from a company like Costco, then using those resources to create a meal. The cost would be much lower than purchasing a full meal from a restaurant but requires time and skill to convert to a meal.
MaaS #
MaaS (Metal as a Service) is the ability to rent actual physical servers vs. virtualized servers. One of the advantages of this approach is for specialized scenarios like training deep learning models. A compute operation may require the highest amount of resources available. Virtualization causes some overhead, and eliminating it will allow these specialized operations to fully access the “metal.”
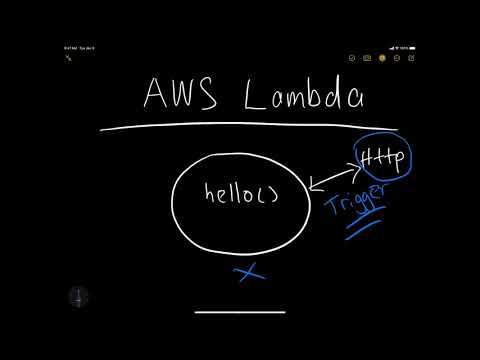
Serverless #
One way to think about serverless is that “Serverless” refers to running without thinking about servers. An excellent example of this is AWS Lambda. The benefit of using serverless has many benefits. One advantage is the ability to focus on writing functions vs. managing servers. Another benefit is the ability to use new paradigms like event-driven programming against cloud-native resources.
PaaS Continuous Delivery #
What follows is an example of using a PaaS platform, Google App Engine, of deploying a Flask web application continuously.
Google App Engine and Cloud Build Continuous Delivery #
source code examples in this section are: https://github.com/noahgift/delivery and https://github.com/noahgift/gcp-hello-ml.
Watch a screencast on deploying Google App Engine.

Video Link: https://www.youtube.com/watch?v=_TfWdOvQXwU
To get started with Continuous Delivery, do the following.
- Create a Github repo
- Create a project in GCP UI (your project name will be different) 2A Setup API as well

-
Next, activate cloud-shell and add ssh-keys if not already added to Github: i.e.
ssh-keygen -t rsathan upload key to Github ssh settings. -
Create an initial project scaffold. You will need the following files, which you can create with the following commands. Note you can copy
app.yaml,main.py,main_test.pyandrequirements.txtfrom this repo from google.
- Makefile:
touch Makefile
This scaffolding allows for an easy to remember convention.
- requirements.txt:
touch requirements.txt
These are the packages we use.
- app.yaml:
touch app.yaml
The app.yaml is part of the IaC (Infrastructure as Code) and configures the PaaS environment for Google App Engine.
- main.py:
touch main.py
The files are the logic of the Flask application.
- Finally, run describe using the
gcloudcommand-line to verify the project is working.
gcloud projects describe $GOOGLE_CLOUD_PROJECT
output of command:
createTime: '2019-05-29T21:21:10.187Z'
lifecycleState: ACTIVE
name: helloml
projectId: helloml-xxxxx
projectNumber: '881692383648'
- (optional) You may want to verify you have the correct project and if not, do this to switch:
gcloud config set project $GOOGLE_CLOUD_PROJECT
- Next, create an app engine app in the Cloud:
gcloud app create
This step will ask for the region. Go ahead and pick us-central [12] or another region if you are an advanced user.
Creating App Engine application in project [helloml-xxx] and region [us-central]....done.
Success! The app is now created. Please use `gcloud app deploy` to deploy your first app.
- Create and source the virtual environment.
virtualenv --python $(which python) venv
source venv/bin/activate
Now, double-check it works.
which python
/home/noah_gift/python-docs-samples/appengine/standard_python37/hello_world/venv/bin/python
- Next, activate the cloud shell editor, or use a terminal editor like
vim.

- Now install packages.
make install
This step should install flask and other packages you have created.
Flask==1.x.x
- Now, run
flasklocally.
This command runs flask locally in the GCP shell.
python main.py
- Now preview the running application.

- Now that the application is running, try for an update of the
main.py.
from flask import Flask
from flask import jsonify

app = Flask(__name__)

@app.route('/')
def hello():
    """Return a friendly HTTP greeting."""
    return 'Hello I like to make AI Apps'

@app.route('/name/<value>')
def name(value):
    val = {"value": value}
    return jsonify(val)

if __name__ == '__main__':
    app.run(host='127.0.0.1', port=8080, debug=True)
- You can test out passing in parameters to exercise this function:
@app.route('/name/<value>')
def name(value):
    val = {"value": value}
    return jsonify(val)
For example, calling this route will take the word lion and pass into the Flask application’s name function.
https://8080-dot-3104625-dot-devshell.appspot.com/name/lion
This step returns the value in a web browser:
{
value: "lion"
}
- Now deploy the app
gcloud app deploy
Warning the first deployment could take about 10 minutes FYI!!! You may also need to enable cloud build API.
Do you want to continue (Y/n)?  y
Beginning deployment of service [default]
...Uploading 934 files to Google Cloud Storage...
- Now stream the log files.
gcloud app logs tail -s default
- The production app is deployed and should like the following output.
Setting traffic split for service [default]...done.
Deployed service [default] to [https://helloml-xxx.appspot.com]
You can stream logs from the command line by running:
  $ gcloud app logs tail -s default

  $ gcloud app browse
(venv) noah_gift@cloudshell:~/python-docs-samples/appengine/standard_python37/hello_world (helloml-242121)$ gcloud app
 logs tail -s default
Waiting for new log entries...
2019-05-29 22:45:02 default[20190529t150420]  [2019-05-29 22:45:02 +0000] [8] [INFO] Starting gunicorn 19.9.0
2019-05-29 22:45:02 default[20190529t150420]  [2019-05-29 22:45:02 +0000] [8] [INFO] Listening at: http://0.0.0.0:8081
 (8)
2019-05-29 22:45:02 default[20190529t150420]  [2019-05-29 22:45:02 +0000] [8] [INFO] Using worker: threads
2019-05-29 22:45:02 default[20190529t150420]  [2019-05-29 22:45:02 +0000] [25] [INFO] Booting worker with pid: 25
2019-05-29 22:45:02 default[20190529t150420]  [2019-05-29 22:45:02 +0000] [27] [INFO] Booting worker with pid: 27
2019-05-29 22:45:04 default[20190529t150420]  "GET /favicon.ico HTTP/1.1" 404
2019-05-29 22:46:25 default[20190529t150420]  "GET /name/usf HTTP/1.1" 200
- Add a new route and test it out
@app.route('/html')
def html():
    """Returns some custom HTML"""
    return """
    <title>This is a Hello World World Page</title>
    <p>Hello</p>
    <p><b>World</b></p>
    """
- Install pandas and return
jsonresults. At this point, you may want to consider creating a Makefile and do this:
touch Makefile
#this goes inside that file
install:
	pip install -r requirements.txt
you also may want to setup lint:
pylint --disable=R,C main.py
------------------------------------
Your code has been rated at 10.00/10
The route looks like the following, so add pandas import at the top.
import pandas as pd
@app.route('/pandas')
def pandas_sugar():
    df = pd.read_csv("https://raw.githubusercontent.com/noahgift/sugar/master/data/education_sugar_cdc_2003.csv")
    return jsonify(df.to_dict())
When you call the route https://<yourapp>.appspot.com/pandas, you should get something like the following output.

Cloud Build Continuous Deploy #
Finally, set up Cloud Build Continuous Deploy you can follow the guide here.
- Create a
cloudbuild.yamlfile - Add to the repo and push
git add cloudbuild.yaml,git commit -m "add cloudbuild config",git push origin master. - Create a build trigger
- Push a simple change
- View progress in build triggers page
References #
These are additional references that are helpful for GAE Continuous Delivery.
Building Multiple Types of Websites #
Due to the breadth of service options from Cloud Computing, there are many ways to build websites, from static to serverless to virtualized to PaaS. Let’s take a look at a few different examples.
The following screencast is a step by step Demo of three websites getting built (AWS Static S3, AWS Lambda in Python, and EC2 Spot Instance).
Watch “Demo: A Tale of Three Websites” in the following screencast.

Video Link: https://www.youtube.com/watch?v=acmuuHhrmSs
Instructions AWS S3 Website #
To build a very simple static hosted website on AWS S3, you can follow S3 Hosting Instructions here. The general concept in a static website is the HTML assets generate before viewing. These assets then go into a Content Delivery Network that distributes the assets to edge locations worldwide. This technique is an optimal design for the fastest possible web page viewing time.
Build a simple static S3 Website on AWS in the following screencast.
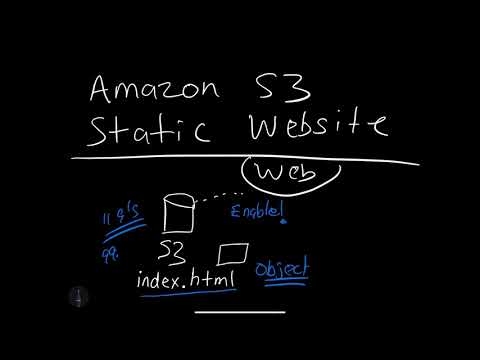
Video Link: https://www.youtube.com/watch?v=zFO-rcYY3B4
Instructions AWS Lambda Website #
AWS Lambda is perhaps the most straightforward way to build a website that delivers HTML quickly. To do this step, use the following directions.
-
Use AWS Cloud9 and “right-click” to a new lambda function.
-
Paste the code below into the editor. The following example demonstrates the Python code necessary to build a Lambda function that returns HTML.
def lambda_handler(event, context):
    content = """
    <html>
    <p> Hello website Lambda </p>
    </html>
    """
    response = {
        "statusCode": 200,
        "body": content,
        "headers": {"Content-Type": "text/html",},
    }
    return response
- “Right-click” deploy the lambda function
- Log in to the AWS console and click on the API Gateway icon in the AWS Lambda section. Verify that it returns “Hello website Lambda.”
You can also follow on how to “Build a simple AWS Lambda Website” in the following screencast.
Video Link: https://www.youtube.com/watch?v=lrr6h7YIcI8
Instructions AWS EC2 Website #
An older but still useful way to build a website is to launch a Virtual Machine, install a webserver on it, and then serve out traffic via a language like PHP, Python, or Ruby. To setup, a Linux, Apache, MySQL, PHP (LAMP) configuration, do the following.
Follow the tutorial on setting up LAMP Site here or feel free to improvise and follow the more straightforward guide shown, as shown in the following screencast, “Build a simple AWS EC2 Website”.

Video Link: https://www.youtube.com/watch?v=xrG6UyhZE9Q
Instructions AWS Elastic Beanstalk Website #
AWS Elastic Beanstalk is an excellent option for a PaaS target for Flask on the AWS platform. You can refer to this Github project for the sample code to build this demo.
The main steps are below.
A. Install the eb tool via these [instructions](Install eb tool: https://docs.aws.amazon.com/elasticbeanstalk/latest/dg/eb-cli3-install.html).
B. Create a Flask application, as shown.
from flask import Flask
from flask import jsonify
app = Flask(__name__)

@app.route('/')
def hello():
    """Return a friendly HTTP greeting."""
    print("I am inside hello world")
    return 'Hello World! CD'

@app.route('/echo/<name>')
def echo(name):
    print(f"This was placed in the url: new-{name}")
    val = {"new-name": name}
    return jsonify(val)


if __name__ == '__main__':
   # Setting debug to True enables debug output. This line should be
   # removed before deploying a production app.
   application.debug = True
   application.run()
C. Use the eb deploy command as referenced here.
Build a simple Flask AWS Elastic Beanstalk Website in the following screencast.

Video Link: https://www.youtube.com/watch?v=51lmjwXvVw8
Exercise-Create-Four-Websites #
- Topic: Create Four Different Types of Websites
- Estimated time: 30+ minutes
- Slack Channel: #noisy-exercise-chatter
- People: Individual or Final Project Team
- Directions:
- Part A: Create S3 static hosted website
- Part B: Create AWS Lambda website
- Part C: (If time permits) Create EC2 based website
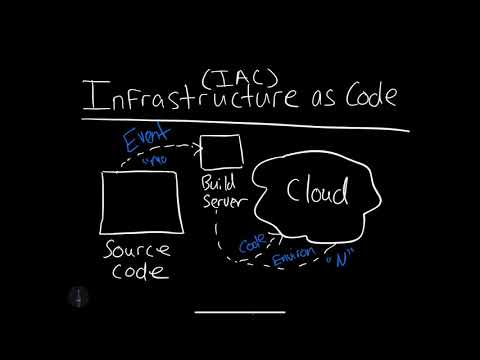
IaC (Infrastructure as Code) #
The best way to think of Infrastructure as Code is in the literal sense. There is a long history of configuration languages that manage infrastructure. When I worked at Caltech in 2000, I used tools like radmind, CFEngine and [Tripwire](https://en.wikipedia.org/wiki/Tripwire_(company). Later in my career, I used Puppet, Chef, Ansible and salt stack.
Newer generation tools include Terraform and Pulumi. The general concept is that the application software and the deployment environment benefit from automation. Humans make mistakes, but automation is forever.
Learn what IAC is in the following screencast.
Video Link: https://www.youtube.com/watch?v=rfZWRpN6Da4
Learn what IAC in the real world is in the following screencast.

Video Link: https://www.youtube.com/watch?v=nrCYVyBuOIw
Launch a VM with Terraform in the following screencast.
Video Link: https://www.youtube.com/watch?v=mh4qf0MS0F4
What is Continuous Delivery and Continuous Deployment? #
Let’s build on the knowledge of Continuous Delivery from Chapter one. It is a technique that leverages several powerful tools continuous integration, IaC, and Cloud Computing. Continuous Delivery lets the cloud infrastructure be defined as code and allows for near real-time changes of both code and new environments.
Continuous Delivery for Hugo Static Site from Zero #
Hugo is a popular static site generator. This tutorial will guide you through using AWS Cloud9 to create a Hugo website and develop against it using the cloud development environment. The final step will be the set up a continuous integration pipeline using AWS Code Pipeline.
Note these steps will be similar for other cloud environments or your OS X laptop, but this particular tutorial targets AWS Cloud9.
The steps described next appear in this screencast AWS Hugo Continuous Delivery.

Video Link: https://www.youtube.com/watch?v=xiodvLdPnvI
- Step 1: Launch an AWS Cloud9 Environment
Use the AWS Free Tier and a Cloud9 Environment with the defaults.
- Step2: Download the
hugobinary and put it in your Cloud9 path.
Go to the latest releases of hugo https://github.com/gohugoio/hugo/releases. Download the latest release using the wget command. It should look similar to the following:
wget https://github.com/gohugoio/hugo/releases/download/v0.79.1/hugo_0.79.1_Linux-64bit.tar.gz
Note that you shouldn’t just blindly cut and paste the code above! Make sure you get the latest release or if not on Cloud9, use the appropriate version
Now put this file in your ~/.bin directory using these commands (again make sure you put your version of hugo here: i.e. hugo_0.99.x_Linux-32bit.tar.gz):
tar xzvf hugo_<VERSION>.tar.gz
mkdir -p ~/bin
mv ~/environment/hugo . #assuming that you download this into ~/environment
which hugo              #this shows the `path` to hugo
The output of which hugo should be something like:
ec2-user:~/environment $ which hugo
~/bin/hugo
Finally, check to see that the version flag works as a basic sanity check. This output is what it looks like on my cloud9 machine (your version number will likely be different)
ec2-user:~/environment $ hugo version
Hugo Static Site Generator v0.79.1-EDB9248D linux/386 BuildDate: 2020-12-19T15:41:12Z
These steps get you access to hugo, and you can run it like any other command-line tool. If you cannot or get stuck, refer to the screencast later and look at the quickstart guide.
- Step3: Make a
hugowebsite locally and test it in Cloud9
One great thing about hugo is that it just a go binary. It makes it simple to both develop and deploy hugo sites. The following section derives from the official hugo quickstart guide.
A. Create a new repo in Github and clone it into your environment. Change into it via the “cd” command. Add a .gitignore file with the word public in it. This step will stop the public directory from checking into the repo.
B. Create a new site using the following command: hugo new site quickstart
C. Add a theme (you could swap this part with any theme you want).
cd quickstart
git submodule add https://github.com/budparr/gohugo-theme-ananke.git themes/ananke
echo 'theme = "ananke"' >> config.toml
- Step4: Create a post
To create a new blog post, type the following command.
hugo new posts/my-first-post.md
This post is easily editable inside of AWS Cloud9, as shown in the following screenshot.

- Step5: Run Hugo locally in Cloud9
Up to this point, things have been relatively straightforward. In this section, we are going to run hugo as a development server. This step will require us to open up a port on EC2 security groups. To do this step, proceed with the following tasks.
A. Open a new tab on the AWS Console and type in EC2 and scroll down to security groups and look for the security group with the same name as your AWS Cloud9 environment as shown:
 .
.
B. Open up via new TCP rule port 8080 and the edit button. This step will allow us to browse to port 8080 to preview our website as we develop it locally on AWS Cloud9.
C. Navigate back to AWS Cloud9 and run the following command to find out the IP Address (we will use this IP Address when we run hugo). Note you can also find your IP Address from the AWS Console for EC2)
curl ipinfo.io
You should see something like this (but with a different IP Address).
ec2-user:~/environment $ curl ipinfo.io
{
  "ip": "34.200.232.37",
  "hostname": "ec2-34-200-232-37.compute-1.amazonaws.com",
  "city": "Virginia Beach",
  "region": "Virginia",
  "country": "US",
  "loc": "36.8512,-76.1692",
  "org": "AS14618 Amazon.com, Inc.",
  "postal": "23465",
  "timezone": "America/New_York",
  "readme": "https://ipinfo.io/missingauth"
D. Run hugo with the following options; you will need to swap this IP Address out with the one you generated earlier. Notice that the baseURL is essential so you can test navigation.
hugo serve --bind=0.0.0.0 --port=8080 --baseURL=http://34.200.232.37/
If this was successful, you should get something similar to the following output.

E. Open a new tab in your browser and type paste in the URL in the output. In my production, it is http://34.200.232.37:8080/, but it will be different for you.

If you edit the markdown file, it will render out the changes live. This step allows for an interactive development workflow.
- Step6: Create Static Hosted Amazon S3 website and deploy to the bucket.
The next thing to do is to deploy this website directory to an AWS S3 bucket. You can follow the instructions here on creating an s3 bucket and set it up for hosting.
This step also means setting a bucket policy via the bucket policy editor, as shown below. The name of your bucket WILL NOT BE cloud9-hugo-duke you must change this.
{
    "Version": "2012-10-17",
    "Statement": [
        {
            "Sid": "PublicReadGetObject",
            "Effect": "Allow",
            "Principal": "*",
            "Action": [
                "s3:GetObject"
            ],
            "Resource": [
                "arn:aws:s3:::cloud9-hugo-duke/*"
            ]
        }
    ]
}
The bucket policy editor workflow looks as follows.

- Step7: Deploy the website manually before it becomes fully automated
With automation, it is essential to manually write down the steps for a workflow before fully automating it. The following items will need confirmation:
A. The config.toml will need to be edited, as shown below. Note that your s3 bucket URL will be different.
baseURL = "http://cloud9-hugo-duke.s3-website-us-east-1.amazonaws.com"
languageCode = "en-us"
title = "My New Hugo Sit via AWS Cloud9"
theme = "ananke"

[[deployment.targets]]
# An arbitrary name for this target.
name = "awsbucket"
URL = "s3://cloud9-hugo-duke/?region=us-east-1" #your bucket here
B. Now, you can deploy by using the built-in hugo deploy command. The deployment command output should look like this after you run hugo deploy. You can read more about the deploy command in the official docs.
ec2-user:~/environment/quickstart (master) $ hugo deploy
Deploying to target "awsbucket" (s3://cloud9-hugo-duke/?region=us-east-1)
Identified 15 file(s) to upload, totaling 393 kB, and 0 file(s) to delete.
Success!
The contents of the AWS S3 bucket should look similar to this.

The website demonstrated in this tutorial is visible here: http://cloud9-hugo-duke.s3-website-us-east-1.amazonaws.com/
- Step8: Check into Github
A. Create a new Github repo (and add .gitignore)

(Remember to double check you added a .gitignore and added public to `.gitignore)
B. In AWS Cloud9, in the quickstart directory, create a Makefile with a clean command. This will rm -rf the public HTML directory that hugo creates. You don’t want to check this into source control.

clean:
	echo "deleting generated HTML"
	rm -rf public
C. Now run make clean to delete the public directory and all of the source code hugo generated (don’t worry, it regenerates HTML anytime you run hugo).
- Add the source code and push to Github.
Typically I get the “lay of the land” before I commit. I do this by running git status. Here is my output in the next section. You can see that I need to Makefile archetypes config.toml and content/.
ec2-user:~/environment/quickstart (master) $ git status
On branch master

No commits yet

Changes to be committed:
  (use "git rm --cached <file>..." to unstage)

        new file:   .gitmodules
        new file:   themes/ananke

Untracked files:
  (use "git add <file>..." to include in what will be committed)

        Makefile
        archetypes/
        config.toml
        content/
I add them by typing the command git add *. You can see below that this will add all of those files and directories:
ec2-user:~/environment/quickstart (master) $ git add *
ec2-user:~/environment/quickstart (master) $ git status
On branch master

No commits yet

Changes to be committed:
  (use "git rm --cached <file>..." to unstage)

        new file:   .gitmodules
        new file:   Makefile
        new file:   archetypes/default.md
        new file:   config.toml
        new file:   content/posts/my-first-post.md
        new file:   themes/ananke
Now push these files by doing the following command.
git push
You can see what this looks like below:

The Github repo looks like this now:

NOTE: Using git can be very challenging in edge cases. If this workflow doesn’t work, you can also start over from scratch and clone your GitHub repo and manually add hugo into it
(Optional step: If you want to verify your hugo site, check out this project on your laptop or another AWS Cloud9 instance and run hugo.)
- Step9: Continuous Delivery with AWS CodeBuild
Now it is time for the final part. Let’s continuously setup delivery using AWS CodeBuild. This step will allow changes that get pushed to Github to deploy automatically.
A. Go to AWS CodeBuild and create a new project. It is should look like this:

Note create a build in the same region you made your bucket: i.e., N. Virginia!
B. The source code section should look similar to this screenshot. Note the webhook. This step will do continuous delivery on changes

C. The AWS Code Build environment should look similar to this. Click the “create build” button:

D. After you create the build navigate to the “Build details” section and select the service role. This where the privileges to deploy to S3 will be setup:

You will add an “admin” policy that looks like this:

Now, in AWS Cloud9, go back and create the final step.
The following is a buildspec.yml file you can paste it. You create the file with AWS Cloud9 by typing: touch buildspec.yml then editing.
NOTE: Something like the following aws s3 sync public/ s3://hugo-duke-jan23/ --region us-east-1 --delete is an effective and explicit way to deploy if hugo deploy is not working correctly
version: 0.2

environment_variables:
  plaintext:
    HUGO_VERSION: "0.79.1"

phases:
  install:
    runtime-versions:
      docker: 18
    commands:
      - cd /tmp
      - wget https://github.com/gohugoio/hugo/releases/download/v${HUGO_VERSION}/hugo_${HUGO_VERSION}_Linux-64bit.tar.gz
      - tar -xzf hugo_${HUGO_VERSION}_Linux-64bit.tar.gz
      - mv hugo /usr/bin/hugo
      - cd -
      - rm -rf /tmp/*
  build:
    commands:
      - rm -rf public
      - hugo
      - aws s3 sync public/ s3://hugo-duke-jan23/ --region us-east-1 --delete
  post_build:
    commands:
      - echo Build completed on `date`
Now check this file into git and push:
git add buildspec.yml
git commit -m "adding final build step."
git push
It should look like this:

Now every time you make changes to the content directory, it will “auto-deploy” as shown.

As you create new posts, etc., it will deploy.

Hugo AWS Continuous Delivery Conclusion #
Continuous Delivery is a powerful technique to master. In this situation, it could immediately be useful to build a portfolio website for a Data Scientist or a new website like the New York Times or Wall Street Journal.
Post Setup (Optional Advanced Configurations & Notes) #
The following are additional notes on how to do more advanced setup actions for Hugo.
Setting up SSL for CloudFront #
Go to AWS Certificate Manager and click Request a certificate button.
First, we need to add domain names, in our case (example.com). When you enter the domain name as *.example.com, click Add another name to this certificate button and add the bare domain example.com too. Next step, select the DNS validation option and click the Confirm and request button in Review.
To use DNS validation, you add a CNAME record to the DNS configuration for your domain. Add CNAME record created on ACM to the DNS configuration for your domain on Route 53.
CloudFront configurations #
Create a web distribution in the CloudFront section. In the Origin Domain Name field, select Endpoint of your bucket. Select “Redirect HTTP to HTTPS” from the Viewer Protocol Policy. Add your domain names in the Alternate Domain Name filed and select the SSL certificate you have created in the ACM. In the Default Root Object type index.html. Once done, please proceed and complete the distribution.
Integrating Route53 with CloudFront distribution: #
Copy the domain name from the CloudFront distribution and edit A record in your Route53. Select Alias, in Alias Target, enter your CloudFront domain URL which is ******.cloudfront.net. Click Save Record Set. Now that you have created A record. The domain name example.com will route to your CloudFront distribution.
We need to create a CNAME record to point other sub-domains like www.example.com to map to the created A record
Click Create Record Set, enter * in name textbox. Select CNAME from Type. In value, type the A record; in our case, it will be example.com. Click Save Record Set. Now even www.example.com will forward to example.com, which in turn will forward to CloudFront distribution.
Building Hugo Sites Automatically Using AWS CodeBuild #
The first thing that we need is a set of instructions for building the Hugo site. Since the build server starts cleaning every time up push event, this step includes downloading Hugo and all the dependencies required. One of the options that CodeBuild has for specifying the build instruction is the buildspec.yaml file.
Navigate to the CodeBuild console and create a new project using settings similar to this or that meet your project’s demands:
- Project name:
somename-hugo-build-deploy - Source provider:
GitHub - Repository:
Use a repository in my account. - Choose a repository:
Choose your GitHub repository - Click on Webhook checkbox for rebuilding project every time a code change pushes to this repository
- Environment image:
Use an image managed by AWS CodeBuild - Operating System:
Ubuntu - Runtime:
Base - Runtime version:
Choose a runtime environment version - Buildspec name:
buildspec.yml - Artifact type:
No artifact - Cache:
No cache - Service role:
Create a service role in your account
Creating IAM Role #
For building a project, deploy to S3 and enable CloudFront Invalidation, we need to create an individual IAM role. Add IAM role and attach CloudFrontFullAccess and AmazonS3FullAccess policies. After that, click Add permissions button again, select “Attach existing policies directly,” and click the Create policy button. Select “JSON” and paste the following user policy:
{
    "Version": "2012-10-17",
    "Statement": [
        {
            "Sid": "VisualEditor0",
            "Effect": "Allow",
            "Action": "cloudfront:CreateInvalidation",
            "Resource": "*"
        },
        {
            "Sid": "VisualEditor1",
            "Effect": "Allow",
            "Action": [
                "s3:PutObject",
                "s3:ListBucket",
                "s3:DeleteObject",
                "s3:PutObjectAcl"
            ],
            "Resource": [
                "arn:aws:s3:::s3-<bucket-name>",
                "arn:aws:s3:::s3-<bucket-name>/*"
            ]
        },
        {
            "Sid": "VisualEditor2",
            "Effect": "Allow",
            "Action": "s3:*",
            "Resource": [
                "arn:aws:s3:::s3-<bucket-name>",
                "arn:aws:s3:::s3-<bucket-name>/*"
            ]
        }
    ]
}
Case Studies-Hugo-Continuous-Deploy #
What are some logical next steps you could improve?
- Setup the build server to have a more granular security policy.
- Create an SSL certificate via AWS (for free).
- Publish your content to the AWS Cloudfront CDN.
- Enhance the
Makefileto use adeploycommand you also use in the build server instead of the verboseaws synccommand. - Try to “deploy” from many spots: Laptop, editing Github pages directly, a different cloud.
- Can you use the built-in
hugodeployment commands to simplify this setup?
Take some or all of these case study items and complete them.
Summary #
This chapter covers foundational topics in Cloud Computing, including Economics of Cloud Computing, What is Cloud Computing, Cloud Computing Service models, and several hands-on approaches to building Cloud Computing applications and services.