Chapter3: Virtualization & Containerization & Elasticity #
A key concept in cloud computing is the ability to use abstractions to solve problems. This chapter explores the use of elastic resources that scale to meet the demands placed on them and Virtualization and Containers.
Elastic Resources #
One of the cloud benefits is the ability to use elastic capabilities, namely, compute and storage. One such resource is an Elastic File System (EFS) on AWS. It works well with other ephemeral resources like spot instances. In particular, the ability to use a file system that is mountable by a cluster of machines and can grow to meet the I/O demands is a big deal.
Another elastic resource is virtual machines. They are handy for scaling web services, trying out prototypes, or bidding on spare capacity, as in AWS Spot Instances.
Learn how AWS Spot Instances work in the following screencast.
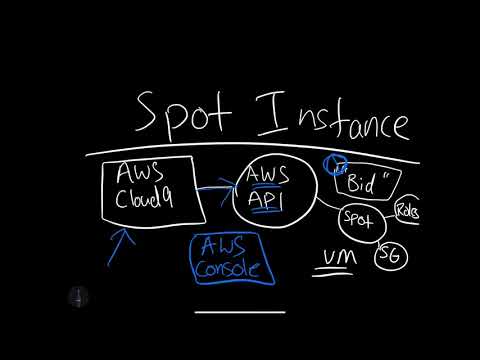
Video Link: https://www.youtube.com/watch?v=-1IMtT4idB0
Learn to launch AWS Spot Instances in the following screencast.
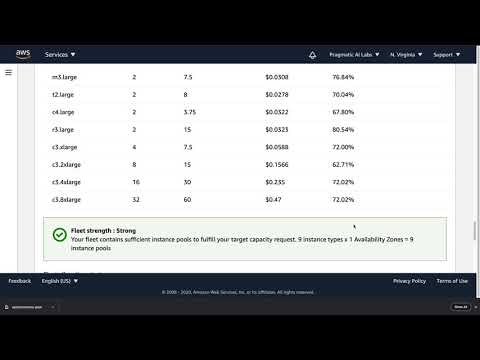
Video Link: https://www.youtube.com/watch?v=H24h3DoOZtE
Learn to launch GCP Virtual Machines in the following screencast.

Video Link: https://www.youtube.com/watch?v=OWR-d5utNmI
Learn to launch an Azure Compute Cluster in the following screencast.

Video Link: https://www.youtube.com/watch?v=TwpP90LX3IU
Build Continuous Delivery with EFS (NFS OPS) #
One emerging concept is the ability to use an Elastic Filesystem as the mechanism for Continuous Delivery. I call this approach NFSOPS, as in Network File System Operations. This approach has been time tested in the Film Industry for decades. With the cloud, these capabilities come to the mainstream.

To test out your own NFSOPs workflow, do the following steps.
-
Launch an Amazon Linux instance using Amazon Linux AMI.
-
Login to your Amazon Linux instance by using AWS Cloud9.
-
Become root using
sudo su -command. -
Update your repositories
yum update
- Install the correct version of JAVA, such as the approach here.
[ec2-user ~]$ sudo yum remove java-1.7.0-openjdk
[ec2-user ~]$ sudo yum install java-1.8.0
- Get Jenkins running in a python virtual env. The reason for this is to allow the Jenkins server to test Python code while prototyping the installation.
https://jenkins.io/doc/book/installing/#war-file
- Setup build server that deploys to EFS mount point
Finally, setup the Jenkins build server to use the EFS mount point. You can follow the installation steps from the official AWS documentation. The last step would be to test your code and then use rsync --avz *.py /mnt/efs/src or something similar if the build passes the tests.
Containers: Docker #
Containers have been around for quite some time. In 2007 I worked with Solaris LDOMs at a startup. Ever since that time, they have always caught my attention for the power and elegance they bring to a problem. Why is that? The main reason containers are elegant is that they allow you to package the runtime alongside the code. A popular format is the Docker format container.
Getting started with Docker #
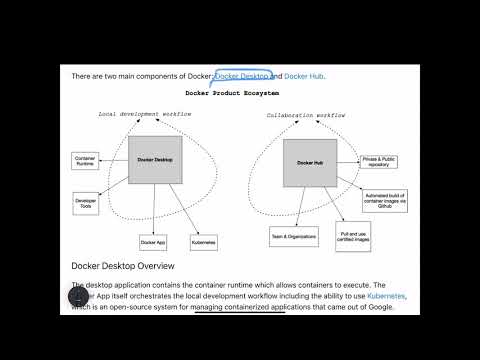
There are two primary components of Docker: Docker Desktop and Docker Hub.

Learn what Docker is in the following screencast.
Video Link: https://www.youtube.com/watch?v=PPeXjwrx7W0
Docker Desktop Overview #
The desktop application contains the container runtime, which allows containers to execute. The Docker App itself orchestrates the local development workflow, including the ability to use Kubernetes, which is an open-source system for managing containerized applications that came out of Google.
Docker Hub Overview #
So what is Docker Hub, and what problem does it solve? Just as the git source code ecosystem has local developer tools like vim, emacs, Visual Studio Code or XCode that work with it, Docker Desktop works with Docker containers and allows for local use and development.
Learn what Docker Hub is in the following screencast.
Video Link: https://www.youtube.com/watch?v=-ksQwxc6Kdg
When collaborating with git outside of the local environment, developers often use platforms like Github or Gitlab to communicate with other parties and share code. Docker Hub works similarly. Docker Hub allows developers to share docker containers that can serve as a base image for building new solutions.
These base images can be built by experts and certified to be high quality: i.e., the official Python developers have a base image. This process allows a developer to leverage the right expert’s expertise on a particular software component and improve their container’s overall quality. This concept is a similar concept to using a library developed by another developer versus writing it yourself.
Why Docker Containers vs. Virtual Machines? #
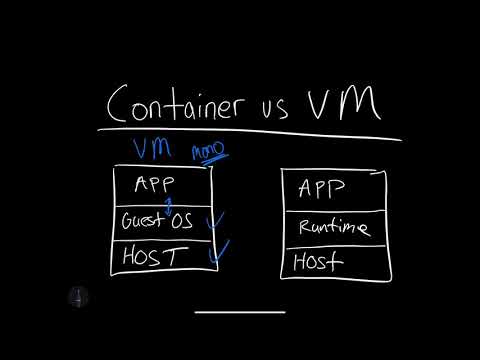
What is the difference between a container and a virtual machine? Here is a breakdown:
-
Size: Containers are much smaller than Virtual Machines (VM) and run as isolated processes versus virtualized hardware. VMs can be GBs, while containers can be MBs.
-
Speed: Virtual Machines can be slow to boot and take minutes to launch. A container can spawn much more quickly, typically in seconds.
-
Composability: Containers programmatically build alongside the application software. They are defined as source code in an Infrastructure as Code project (IaC). Virtual Machines are often replicas of a manually built system. Containers make IaC workflows possible because they are defined as files and checked into source control alongside the project’s source code.
Learn the difference between Containers vs. Virtual Machines is in the following screencast.
Video Link: https://www.youtube.com/watch?v=OU_-7ekVojk
Real-World Examples of Containers #
What problem does Docker format containers solve? In a nutshell, the operating system runtime packages along with the code. This action solves an incredibly complicated problem with a long history. There is a famous meme that goes, “It works on my machine!”. While this is often told as a joke to illustrate the complexity of deploying software, it is also true. Containers solve this exact problem. If the code works in a container, then the container configuration can be checked in as code. Another way to describe this concept is that the existing Infrastructure runs as a code. This concept is called IaC (Infrastructure as Code). Let’s discuss a few specific examples in the next section.
Developer Shares Local Project #
A developer can work on a web application that uses flask (a popular Python web framework). The Docker container file handles the installation and configuration of the underlying operating system. Another team member can check out the code and use docker run to run the project. This process eliminates what could be a multi-day problem of configuring a laptop correctly to run a software project.
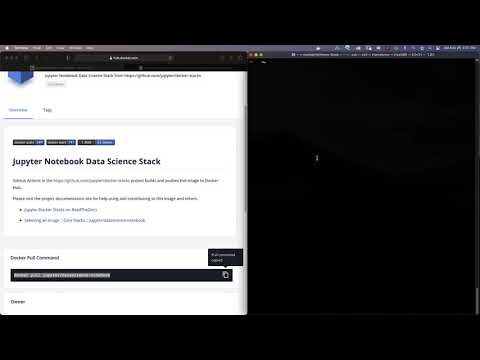
Data Scientist shares Jupyter Notebook with a Researcher at another University #
A data scientist working with jupyter style notebooks wants to share a complex data science project with multiple dependencies on C, Fortran, R, and Python code. They package up the runtime as a Docker container and eliminate the back and forth over several weeks when sharing a project like this.
A Machine Learning Engineer Load Tests a Production Machine Learning Model #
A Machine Learning engineer builds a new ML model and needs to deploy it to production. Previously, they were concerned about accurately testing the accuracy of the new model before committing to it. The model recommends products to pay customers and, if it is inaccurate, it costs the company a lot of money. Using containers to deploy the ML model in this example, it is possible to deploy the model to a fraction of the customers. Only 10% at first, and if there are problems, it can be quickly reverted. If the model performs well, it can promptly replace the existing models.
Learn when to use Containers in the following screencast.
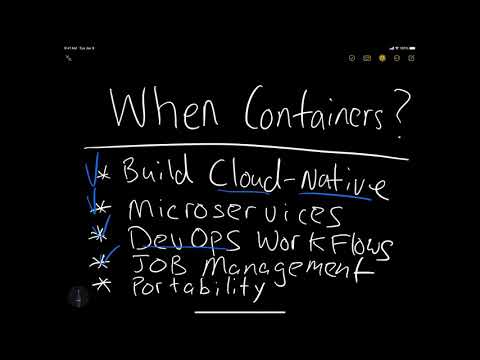
Video Link: https://www.youtube.com/watch?v=jWlhUXIpoPI
Running Docker Containers #
Let’s discuss how to run Docker Containers and the best practices around running them.
Using “base” images #
One of the advantages of the Docker workflow for developers is using certified containers from the “official” development teams. In this diagram, a developer uses the official Python base image developed by the core Python developers. This step is accomplished by the FROM statement, which loads in a previously created container image.

As the developer changes to the Dockerfile, they test locally and then push the changes to a private Docker Hub repo. After this, the changes can be used by a deployment process to a Cloud or by another developer.
Learn to build a Docker container from scratch in the following screencast.
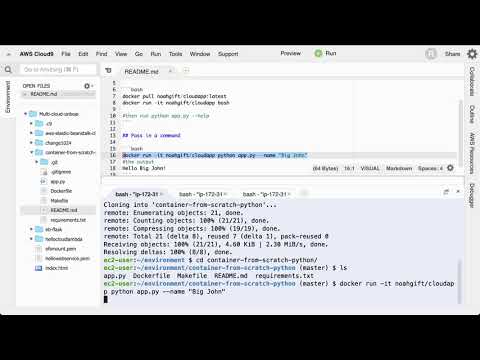
Video Link: https://www.youtube.com/watch?v=2j4YRIwFefA
Common Issues Running a Docker Container #
There are a few common issues that crop up when starting a container or building one for the first time. Let’s walk through each problem and then present a solution for them.
- What goes in a
Dockerfileif you need to write to the host filesystem? In the following example, thedocker volumecommand creates a volume, and then later, it is mounted to the container.
>  /tmp docker volume create docker-data
docker-data
>  /tmp docker volume ls
DRIVER              VOLUME NAME
local               docker-data
>  /tmp docker run -d \
  --name devtest \
  --mount source=docker-data,target=/app \
  ubuntu:latest
6cef681d9d3b06788d0f461665919b3bf2d32e6c6cc62e2dbab02b05e77769f4
- How do you configure logging for a Docker container?
You can configure logging for a Docker container by selecting the type of log drivers, such as json-file and whether it is blocking or non-blocking. This example shows a configuration that uses json-file and mode=non-blocking for an ubuntu container. The non-blocking mode ensures that the application won’t fail in a non-deterministic manner. Make sure to read the Docker logging guide on different logging options.
>  /tmp docker run -it --log-driver json-file --log-opt mode=non-blocking ubuntu
root@551f89012f30:/#
- How do you map ports to the external host?
The Docker container has an internal set of ports that must be exposed to the host and mapped. One of the easiest ways to see what ports are exposed to the host is by running the docker port <container name> command. Here is an example of what that looks like against a foo named container.
$ docker port foo
7000/tcp -> 0.0.0.0:2000
9000/tcp -> 0.0.0.0:3000
What about actually mapping the ports? You can do that using the -p flag as shown. You can read more about Docker run flags here.
docker run -p 127.0.0.1:80:9999/tcp ubuntu bash
- What about configuring Memory, CPU, and GPU?
You can configure docker run to accept flags for setting Memory, CPU, and GPU. You can read more about it here in the official documentation. Here is a brief example of setting the CPU.
docker run -it --cpus=".25" ubuntu /bin/bash
This step tells this container to use at max only 25% of the CPU every second.
NVidia Docker GPU #
You can run an nvidia-container-runtime here. This process allows you to leverage the power of containers as well as an NVidia GPU. For instructions on adding this to a Linux distribution, you can see the nvidia-container-runtime repository page.
Container Registries #
In production workflows involving containers, the containers must eventually live in a public or private registry. For security reasons, among many other good reasons, private registries are frequently the type used for deployment. All major cloud vendors have private container registries that tie into the cloud security environment.
Build containerized application from Zero on AWS Cloud9 #
Now let’s walk through how to build a Docker container from zero using Cloud9.
Learn to build a Docker container from Zero using Cloud9 in the following screencast.

Video Link: https://www.youtube.com/watch?v=wDoNJ7faNdQ
To get started, perform the following steps.
- Launch AWS Cloud9.
- Create a new Github repo.
- Create ssh keys and upload them to Github
- Git clone the new repo.
- Create a project structure, as shown.
Makefile
FROM python:3.7.3-stretch

# Working Directory
WORKDIR /app

# Copy source code to the working directory
COPY . app.py /app/

# Install packages from requirements.txt
# hadolint ignore=DL3013
RUN pip install --upgrade pip &&\
    pip install --trusted-host pypi.python.org -r requirements.txt
requirements.txtDockerfileapp.py
- (optional if you want to try container linting) Install hadolint
# use the latest version
wget -O /bin/hadolint https://github.com/hadolint/hadolint/releases/download/v1.19.0/hadolint-Linux-x86_64 &&\
                chmod +x /bin/hadolint
- (Optional: replace with any build server, say Github Actions) Create CircleCI config.
# Python CircleCI 2.0 configuration file
#
# Check https://circleci.com/docs/2.0/language-python/ for more details
#
version: 2
jobs:
  build:
    docker:
    # Use the same Docker base as the project
      - image: python:3.7.3-stretch

    working_directory: ~/repo

    steps:
      - checkout

      # Download and cache dependencies
      - restore_cache:
          keys:
            - v1-dependencies-{{ checksum "requirements.txt" }}
            # fallback to using the latest cache if no exact match is found
            - v1-dependencies-

      - run:
          name: install dependencies
          command: |
            python3 -m venv venv
            . venv/bin/activate
            make install
            # Install hadolint
            wget -O /bin/hadolint https://github.com/hadolint/hadolint/releases/download/v1.17.5/hadolint-Linux-x86_64 &&\
                chmod +x /bin/hadolint

      - save_cache:
          paths:
            - ./venv
          key: v1-dependencies-{{ checksum "requirements.txt" }}

      # run lint!
      - run:
          name: run lint
          command: |
            . venv/bin/activate
            make lint
- (optional) Install local CircleCI
- setup requirements.txt
pylint
click
- Create
app.py
#!/usr/bin/env python
import click

@click.command()
def hello():
    click.echo('Hello World!')

if __name__ == '__main__':
    hello()
- Build and run the container.
docker build --tag=app .
docker run -it app bash
- Test the app in Docker shell prompt.
python app.py --hello
-
Finally, test local the CircleCI, or whatever local build step you have (say AWS CodeBuild). Also, locally run
make lintand then configure CircleCI. -
Finally, setup Docker Hub Account and deploy it!
Another option is to directly deploy this container to the AWS Container Registry. Learn to build a Docker container to an AWS Container Registry in the following screencast.
Video Link: https://www.youtube.com/watch?v=-i24PIdw_do
Exercise-Create-Hello-World-Container-in-AWS-Cloud9 #
- Topic: Create Hello World Container in AWS Cloud9 and Publish to Docker Hub
- Estimated time: 20-30 minutes
- People: Individual or Final Project Team
- Slack Channel: #noisy-exercise-chatter
- Directions:
- Part A: Build a hello world Docker container in AWS Cloud9 that uses the official Python base image. You can use the sample command-line tools in this repository for ideas.
- Part B: Create an account on Docker Hub and publish there
- Part C: Share your Docker Hub container in slack
- Part D: Pull down another students container and run it
- (Optional for the ambitious): Containerize a flask application and publish
Kubernetes #
One way to reason about Kubernetes is that it is a “cloud in a box”. Let’s talk through some of the details in the following section.
Install Kubernetes #
The simplest way to install Kubernetes is to use Docker Desktop for Windows or Docker Desktop for Mac. This install comes with the kubectl kubernetes command-line tool.
Another way is to use a cloud shell environment like AWS Cloud9 or Google Cloud Shell. These cloud environments dramatically simplify issues that crop up on a laptop or workstation. You can follow the native package management guide from the official documentation here.
A more advanced method for experts could be to download the latest binary directly. HINT: You probably don’t want to use this method and should use the more straightforward process above
From OS X, install the latest kubectl release as follows.
curl -LO "https://storage.googleapis.com/kubernetes-release/release/$(curl -s https://storage.googleapis.com/kubernetes-release/release/stable.txt)/bin/darwin/amd64/kubectl"
On Linux, install the latest kubectl release as follows.
curl -LO https://storage.googleapis.com/kubernetes-release/release/`curl -s https://storage.googleapis.com/kubernetes-release/release/stable.txt`/bin/linux/amd64/kubectl
Overview of Kubernetes #
What is Kubernetes? It is an open-source orchestration system for containers developed by Google and open-sourced in 2014. Kubernetes is a useful tool for working with containerized applications. Given our previous work with Docker containers and containerizing an app, working with Kubernetes is the next logical step. Kubernetes is born out of the lessons learned in scaling containerized apps at Google. It works for automating deployment, scaling, and the management of containerized applications.
Learn an overview of Kubernetes in the following screencast.
Video Link: https://www.youtube.com/watch?v=94DTEQp0giY
- What are the benefits of using Kubernetes?
Kubernetes is the standard for container orchestration. All major cloud providers support Kubernetes. Amazon through Amazon EKS, Google through Google Kubernetes Engine GKE and Microsoft through Azure Kubernetes Service (AKS).
Kubernetes is also a framework for running distributed systems at “planet-scale”. Google uses it to run billions of containers a week.
- A few of the Capabilities of kubernetes include:
- High availability architecture
- Auto-scaling
- Rich Ecosystem
- Service discovery
- Container health management
- Secrets and configuration management
The downside of these features is the high complexity and learning curve of Kubernetes. You can read more about the features of Kubernetes through the official documentation.
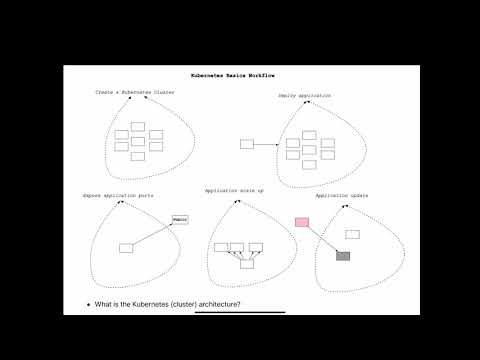
- What are the basics of Kubernetes?
The core operations involved in Kubernetes include creating a Kubernetes Cluster, deploying an application into the cluster, exposing application ports, scaling an application, and updating an application.

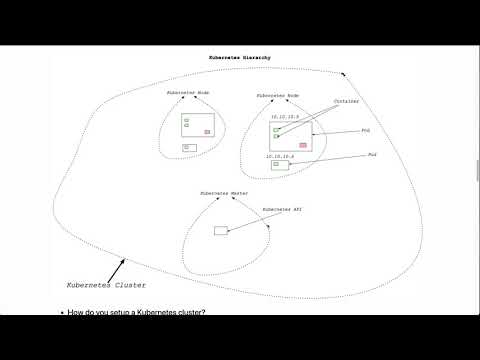
- What are the Kubernetes (cluster) architecture?
The core of Kubernetes is the cluster. Inside of this, the Containers run in the collection. The core components of the cluster include a cluster master and nodes. Inside the nodes, there is yet another hierarchy. This order displays in the diagram. A Kubernetes node can contain multiple pods, containing multiple containers and volumes.

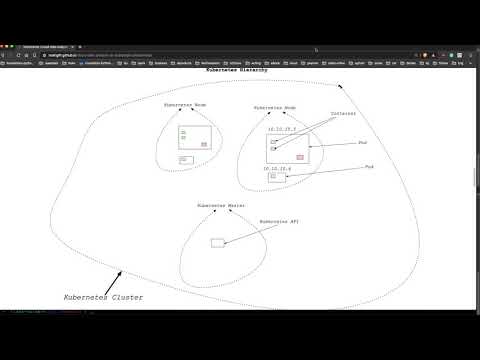
- How do you set up a Kubernetes cluster?
There are two main methods: set up a local cluster (preferably with Docker Desktop) or provision a cloud cluster: Amazon through Amazon EKS, Google through Google Kubernetes Engine GKE and Microsoft through Azure Kubernetes Service (AKS).
If you are using Docker and have enabled kubernetes, you already have a standalone Kubernetes server running. This step would be the recommended way to get started with Kubernetes clusters.
- How do you launch containers in a Kubernetes cluster?
Now that you have Kubernetes running via Docker desktop, how do you launch a container? One of the easiest ways is via the docker stack deploy --compose-file command.
The yaml example file looks like the following:
version: '3.3'

services:
  web:
    image: dockersamples/k8s-wordsmith-web
    ports:
     - "80:80"

  words:
    image: dockersamples/k8s-wordsmith-api
    deploy:
      replicas: 5
      endpoint_mode: dnsrr
      resources:
        limits:
          memory: 50M
        reservations:
          memory: 50M

  db:
    image: dockersamples/k8s-wordsmith-db
This application deploys with the following command:
docker stack deploy --namespace my-app --compose-file /path/to/docker-compose.yml mystack
Autoscaling Kubernetes #
One of the “killer” features of Kubernetes is the ability to set up auto-scaling via the Horizontal Pod Autoscaler. How does this work? The Kubernetes HPA (Horizontal Pod Autoscaler) will automatically scale the number of pods (remember they can contain multiple containers) in a replication controller, deployment or replica set. The scaling uses CPU utilization, memory, or custom metrics defined in the Kubernetes Metrics Server.

There is a Docker articleKubernetes autoscaling in UCP that is an excellent guide to go more in-depth on this topic and experiment with it yourself.
Learn Kubernetes by watching this demo in the following screencast.

Video Link: https://www.youtube.com/watch?v=ZUyNDfZP1eQ
Kubernetes in the Cloud #
The ideal and most common location to use Kubernetes is in a cloud environment. In particular, the cloud solves a major problem in that running a Kubernetes cluster is non-trivial. By leveraging a cloud provider, it can make complex Kubernetes tasks very straightforward.
GKE (Google Kubernetes Engine) #
The Google Cloud is a great way to explore Kubernetes because they are the open-source framework’s originator. Two common ways to use Kubernetes on Google are via GKE and via Google Cloud Run. Google Cloud Run is a very compelling method to deploy prototypes using containers and has much of the same simplicity as Google App Engine.
Learn to deploy Kubernetes on GKE in the following screencast.
Video Link: https://www.youtube.com/watch?v=5pTQJxoK47I
Hybrid and Multi-cloud Kubernetes #
Running Kubernetes locally with Docker Desktop and sklearn flask #
Learn to run Kubernetes locally via Docker Desktop in the following screencast.
Video Link: https://www.youtube.com/watch?v=LcunlZ_T6Ks
Note how kubectl is doing the work as the master node.
#!/usr/bin/env bash

dockerpath="noahgift/flasksklearn"

# Run in Docker Hub container with kubernetes
kubectl run flaskskearlndemo\
    --generator=run-pod/v1\
    --image=$dockerpath\
    --port=80 --labels app=flaskskearlndemo

# List kubernetes pods
kubectl get pods

# Forward the container port to host
kubectl port-forward flaskskearlndemo 8000:80
You can see a walkthrough of how Kubernetes could run a flask sklearn app locally in Docker desktop here.
Kubernetes Summary #
There are many compelling reasons to use Kubernetes. Let’s summarize them:
- Created, Used, and Open Sourced by Google
- High availability architecture
- Auto-scaling is built-in
- Rich Ecosystem
- Service discovery
- Container health management
- Secrets and configuration management
Another advantage is that Kubernetes is cloud-agnostic, and it could be a solution for companies that are willing to take on the additional complexity to protect against “vendor lockin.”
Operationalizing a Microservice Overview #
A critical factor in developing a microservice is to think about the feedback loop. In this diagram, a GitOps style workflow implements.
- Application stored in Git
- Changes in Git trigger the continuous delivery server, which tests and deploys it to a new environment. This environment configures as code Infrastructure as Code (IaC).
- The microservice, which could be a containerized service. It runs in Kubernetes or a FaaS (Function as a Service) running on AWS Lambda. This microservice has logging, metrics, and instrumentation included.
- A load test using a tool like locust

- When the performance and auto-scaling is verified, the code is merged to production and deployed
What are some of the items that could be alerted on with Kubernetes?
- Alerting on application layer metrics
- Alerting on services running on Kubernetes
- Alerting on the Kubernetes infrastructure
- Alerting on the host/node layer
How could you collect metrics with Kubernetes and Prometheus? Here is a diagram that walks through a potential workflow. A few things to note here are that are two pods. One pod attaches to the Prometheus collector, and the second pod has a “sidecar” Prometheus container that sits alongside the Flask application. This process will propagate up to a centralized monitoring system that visualizes the clusters' health and trigger alerts.

Another helpful resource is an official sample project from Google Cloud Monitoring apps running on multiple GKE clusters using Prometheus and Stackdriver
Creating effective alerts #
At one company I worked at, a homegrown monitoring system (again initially created by the founders) alerted on average every 3-4 hours, 24 hours a day.
Because everyone in engineering except the CTO was on call, most of the engineering staff was always sleep deprived because it guaranteed that there were alerts about the system not working every night. The “fix” to the omens was to restart services. I volunteered to be on call for one month straight to allow engineering the time to fix the problem. This sustained period of suffering and lack of sleep led me to realize several things. One, the monitoring system was no better than random. I could potentially replace the real Voodoo with a random coin flip.

Even more distressing in looking at the data was that engineers had spent YEARS of their life responding to pages and getting woken up at night, and it was utterly useless. The suffering and sacrifice accomplished nothing and reinforced the sad truth that life is not fair. The unfairness of the situation was quite depressing, and it took quite a bit of convincing to get people to agree to turn off the alerts. There is a built-in bias in human behavior to continue to do what you have always done. Additionally, because the suffering was so severe and sustained, there was a tendency to attribute a deeper meaning. Ultimately, it was a false God. Reference: Gift, Noah (2020) Python for DevOps: pg. 226
Learn how to use Alerts and Monitoring in the following screencast.

Video Link: https://www.youtube.com/watch?v=xrXjgtOSX6o
Five-Why’s and Kaizen #
One way our troubled company could have swapped Voodoo for a sane alert process was to use the Five Why’s method. In a nutshell, it originated from Kaizen, a process of continuous improvement, from the Japanese Automobile industry post-WWII. The Five Why’s strategy is to keep asking questions until the root cause appears.
Learn about the Five Whys in the following screencast.

Video Link: https://www.youtube.com/watch?v=9jS3cwjIJEo
Learn about Continuous Improvement in the following screencast.

Video Link: https://www.youtube.com/watch?v=mZVbUbYwFQo
Alerting Statistical Theory #
A good way to think about alerts is to think about a normal distribution from Statistics. Consider a normal distribution, “six sigma” and the 68-95-99.7 rule. Computer systems events are often normally distributed, meaning that all events within three standard deviations from the mean occur with 99.7 occurrences.
Design a process that alerts senior engineers when events are more significant than three standard deviations from the mean and write up how the alerts should work, i.e.
-
Who should get a page when an event is more significant than three standard deviants from the mean?
-
Should there be a backup person who gets alerted if the first person doesn’t respond within five minutes?
*Should an alert wake up a team member at one standard deviation? What about two?
Learn to build an alert from scratch in the following screencast.
Video Link: https://www.youtube.com/watch?v=8cl_ZbmgDhw
Getting Started with Prometheus #
Prometheus is a commonly used metrics and alerting solution typically with containers and Kubernetes. To run this tutorial, do the following.
- Use a local environment or preferably AWS Cloud9. If you use AWS Cloud9, you will need to expose port 9090 via EC2 Security Group.
- Download, install and run Prometheus. On AWS Cloud9, you would install the latest release with
*.linux-amd64.tar.gzin the name. This would like something likewget <some release>.linux-amd64.tar.gz.
tar xvfz prometheus-*.tar.gz
cd prometheus-*
- Configure Prometheus by creating a
prometheus.ymlfile
global:
  scrape_interval:     15s
  evaluation_interval: 15s

rule_files:
  # - "first.rules"
  # - "second.rules"

scrape_configs:
  - job_name: prometheus
    static_configs:
      - targets: ['localhost:9090']
- Start Prometheus
Wait about 30 seconds for Prometheus to collect data.
./prometheus --config.file=prometheus.yml
- View data through the expression browser
Go to http://localhost:9090/graph. Choose the “console” within the graph. One metric that Prometheus collects is how many times http://localhost:9090/metrics invokes. If you refresh a few times, then type the following in the expression console, you can see a time series result.
promhttp_metric_handler_requests_total
- View data through the graphing interface
Another way to view data is via the graphing interface. Go to http://localhost:9090/graph. Use the “Graph” tab.
rate(promhttp_metric_handler_requests_total{code="200"}[1m])
- (OPTIONAL) Going further, feel free to experiment with how that would work by following the example below.
A more sophisticated example would involve also collecting data from clients. Next, download these go clients using the code below and run them.
# Fetch the client library code and compile the example.
git clone https://github.com/prometheus/client_golang.git
cd client_golang/examples/random
go get -d
go build

# Start 3 example targets in separate terminals:
./random -listen-address=:8080
./random -listen-address=:8081
./random -listen-address=:8082
Next, add these clients in the prometheus.yml
scrape_configs:
  - job_name:       'example-random'

    # Override the global default and scrape targets from this job every 5 seconds.
    scrape_interval: 5s

    static_configs:
      - targets: ['localhost:8080', 'localhost:8081']
        labels:
          group: 'production'

      - targets: ['localhost:8082']
        labels:
          group: 'canary'
Restart Prometheus and see these metrics in the expression browser.
rpc_durations_seconds.
Based on guide from official Prometheus documentation and guide here
Learn to use Prometheus in the following screencast.
Video Link: https://www.youtube.com/watch?v=4bcBS1G3GWI
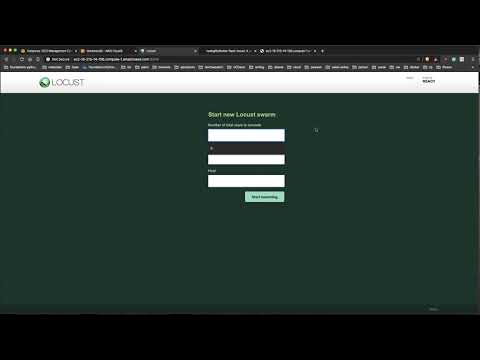
Creating a Locust Load test with Flask #
One powerful way to create a simple load test is with Locust and Flask. Here is an example of a simple flask hello world app. Here is source code for reference.
from flask import Flask
app = Flask(__name__)

@app.route('/')
def hello_world():
    return 'Hello, World!'

if __name__ == "__main__":
    app.run(host='0.0.0.0', port=8080, debug=True)
The load test file is straightforward to configure. Notice the index function calls into the main, and only flask route.
from locust import HttpLocust, TaskSet, between

def index(l):
    l.client.get("/")

class UserBehavior(TaskSet):
    tasks = {index: 1}

class WebsiteUser(HttpLocust):
    task_set = UserBehavior
    wait_time = between(5.0, 9.0)
The login screen requires the number of users and also hostname and port. In our case, this will be port 8080.

You can see how locust works when it runs.

Learn what a Load Test is in the following screencast.

Video Link: https://www.youtube.com/watch?v=fMDDpZoKH7c
Learn how to load test with Docker, Flask and Locust in the following screencast.
Video Link: https://www.youtube.com/watch?v=IokEPPhvQA0
Learn how to use AWS Cloudwatch in the following screencast.
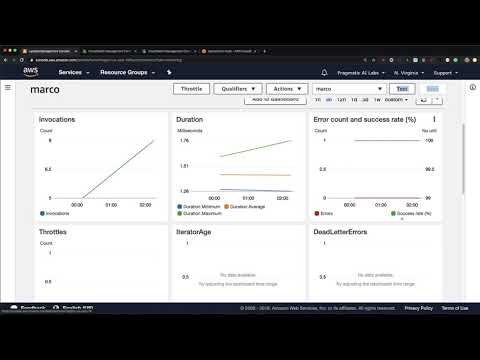
Video Link: https://www.youtube.com/watch?v=QT094Yk99_c
Serverless Best Practices, Disaster Recovery and Backups for Microservices #
An essential but often overlooked part of building production software is designing for failure. There is an expression that the only two certainties in life are death and taxes. We can add another lock to the list, software system failure. In the AWS whitepaper Serverless Application Lens, they discuss five pillars of a well-architected serverless system: operational excellence, reliability, performance efficiency, and cost optimization. It is highly recommended to read this guide thoroughly.
Learn what a Microservice is in the following screencast.

Video Link: https://www.youtube.com/watch?v=me0k1ZLbuVo
Learn where you can run a Microservice is in the following screencast.

Video Link: https://www.youtube.com/watch?v=2vpXLpG39OI
Let’s summarize the critical points for each pillar.
- Operational Excellence
How do you understand the health of a serverless application? One method to understand health is to use metrics and alerts. These metrics could include business metrics, customer experience metrics, and other custom metrics. Another complementary approach is to have centralized logging. This technique allows for unique transaction ideas that can narrow down critical failures.
- Security
Have proper controls and using the POLP (Principle of Least Privilege). Only give out the privileges needed to complete a task to a user, service or developer. Protect data at rest and in transit.
- Reliability
Plan on the fact that failure will occur. Have retry logic for essential service and build a queue system when a service is unavailable. Use highly available services that store multiple copies of the data like Amazon S3 and then archive critical data to benefits that can store immutable backups. Ensure that you have tested these backups and validated them regularly (say quarterly).
- Performance
One key way to validate performance is to load test an application that has proper instrumentation and logging. Several load test tools include: Apache Bench, Locust and load test services like loader.io
- Cost
Serverless technologies like AWS Lambda fit well with cost optimization because they drive by usage. Events trigger services' execution, saving a tremendous amount on cost if the architecture designs to take advantage of this.
Summary of Serverless Best Practices #
One of the advantages of serverless application development is that it encourages IaC and GitOps on top of the highly durable infrastructure. This process means those entire environments spin up to mitigate severe unplanned outages in geographic regions. Additionally, automated load testing alongside comprehensive instrumentation and logging leads to robust environments in the face of disasters.
Exercise-Run-Kubernetes-Engine #
- Topic: Go through Kubernetes Engine: Qwik Start Lab
- Estimated time: 20-30 minutes
- People: Individual or Final Project Team
- Slack Channel: #noisy-exercise-chatter
- Directions:
- Part A: Complete Lab
- Part B: Try to convert Docker project to Kubernetes (In the class or at home)
Summary #
This chapter covered several critical components of cloud computing, including Containers, VMs, and Microservices. The theory and real-world use cases around load-testing and monitoring rounded out the chapter.